MagicTranslate · User Guide
The offline-first translator in your macOS menu bar: selection, screenshot, typing, and long-form bilingual reading. No account required, and local mode keeps your text on your Mac.
Every feature is currently free to use: local translation, screenshot OCR, Live Captions, the dictionary, and long-form reading are all available.
Download on the Mac App StoreQuick Start
Click Get in the Mac App Store, finish installing, then open MagicTranslate from Applications.
MagicTranslate is a menu bar app: it doesn't occupy the Dock and lives in the top-right of your screen. It's ready out of the box — no upfront permissions: type-to-translate, clipboard translation, the dictionary and bilingual reading all work right away. Permission-related features explain what they need when you use them:
- Screen Recording (for screenshot translation / OCR) — the first time you use it, macOS shows the permission prompt; grant it and retry.
System Settings → Privacy & Security → Screen & System Audio Recording → check “MagicTranslate”. - System Audio Recording (for Live Captions) — requested the first time you start captions; it captures system audio only — never the screen contents, never the microphone (a rare fallback path may use the Screen Recording channel instead).
Also under System Settings → Privacy & Security → Screen & System Audio Recording. - Accessibility — the Mac App Store build neither requests nor uses this permission; copy text in another app, then press the translation shortcut.
Ready out of the box: the default engine is Local Fast (Apple's system translation — offline and unlimited), zero setup, zero accounts.
Shortcut Cheatsheet
| Feature | Default shortcut | Notes |
|---|---|---|
| Selection translate | ⌥ D | Select text in any app first, then press |
| Screenshot translate | ⌥ S | Drag-select a screen area → recognize & translate |
| Silent screenshot OCR | ⌥ C | Recognized text goes straight to the clipboard, no window |
| In-image translation (beta) | ⌥ ⇧ S | Pastes the translation back over the original area |
| Type to translate | ⌥ A | Opens the main window for direct input |
| Show / hide main window | ⌥ Space | |
| Toggle Privacy Mode | ⌃ ⌥ P | Fully offline with one key |
Everything is remappable (or clearable) in Settings → Shortcuts. “Read selection aloud”, “Finder image OCR” and “Bilingual Reading” ship unassigned — bind them if you like.
Selection Translate
In your browser, a PDF, or a chat window, select and copy some text, then press ⌥ D; the translation appears instantly.
The Mac App Store build does not request Accessibility permission. It reads the clipboard after you copy text and press ⌥ D; if the clipboard is empty, an input window opens.
Two result styles, switchable anytime
- Full window (default): several engines and the dictionary on one screen — best for careful comparison;
- Compact popup: a small card right by your cursor — read and move on, or pin it (📌) to keep it around.
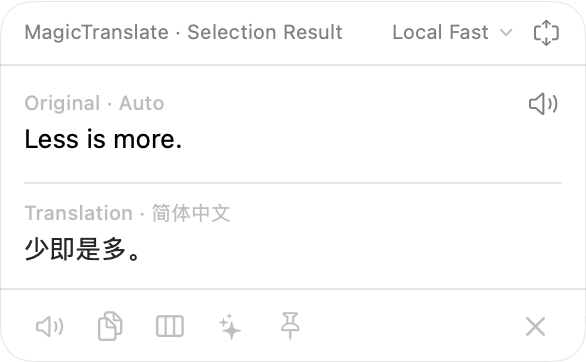
What you can do on a result card
- Copy / read the translation aloud; click the engine name to retranslate with another engine in place;
- Click the pencil to edit the original and retranslate (fix typos / remove stray line breaks);
- Compare engines side by side; press ⌘ K for AI Actions.
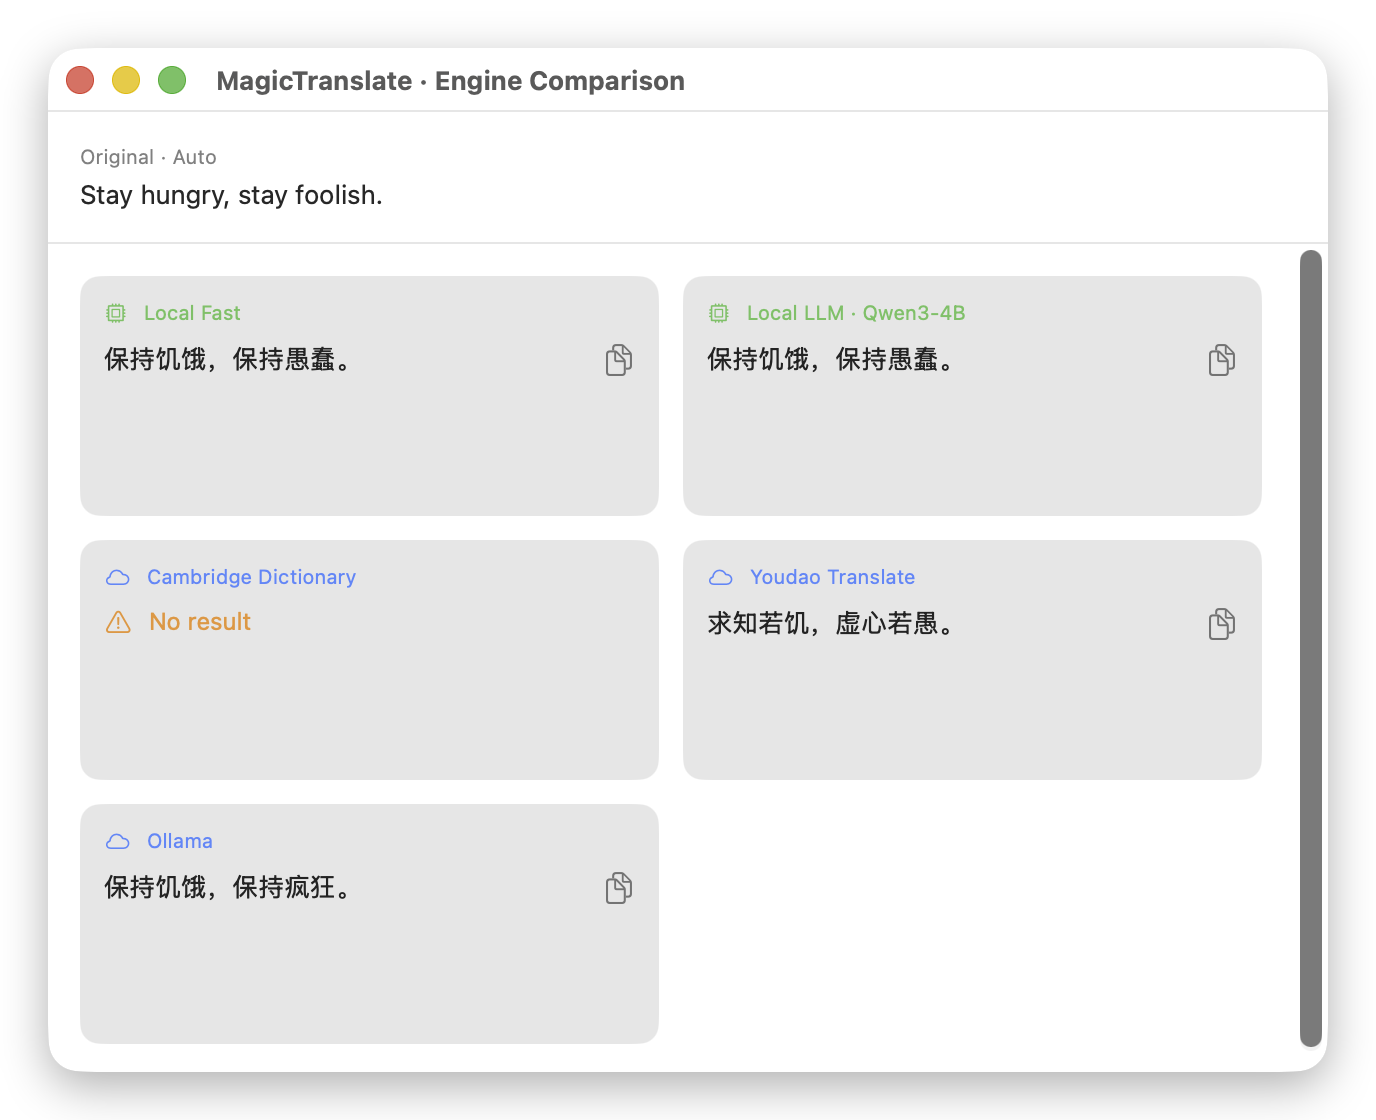
Screenshot Translation & OCR
Press ⌥ S, the screen dims, then drag to select any area — text in images, video subtitles, scans, code comments all get recognized and translated. Recognition runs on-device (Apple Vision, offline).
Helpful for low-vision users too: tiny on-screen text or unselectable text inside images becomes clear, readable text with one selection; in the result window both the original and the translation can be read aloud (🔊), so you can listen to what's on screen instead of straining to see it.
Consecutive capture & stitch (great for long content)
Chat logs, paginated PDFs, long scrolling pages that don't fit one screen? Do this:
- ⌥ S and select the first part — the result appears;
- Click the ⊕ keep capturing icon in the result window (a hint highlights it the first time);
- Scroll, select the next part — new text is appended to the original and the whole piece retranslates;
- Repeat until done; the translation is always one complete text.
Other recognition entries
| Entry | Trigger | Behavior |
|---|---|---|
| Silent OCR | ⌥ C | Recognized text (including QR contents) goes straight to the clipboard — no interruption |
| Finder images | assign a shortcut | Recognize & translate selected image files directly |
| In-image translation (beta) | ⌥ ⇧ S | Pastes the translation back at the original position and size — great for UI shots / charts (needs a local LLM or an enabled cloud engine) |
Type to Translate & the Main Window
⌥ A opens the main window — type or paste, press Return to translate (⇧ Return for a newline). The menu bar icon also has a one-click “Translate Clipboard” entry.
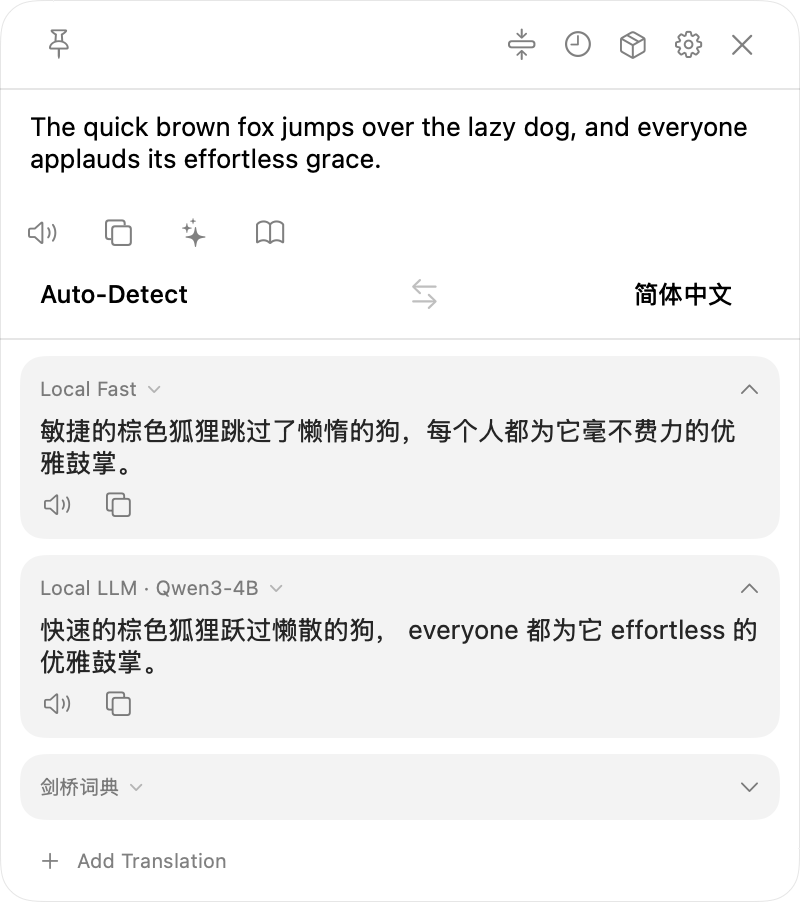
Multiple translation slots (several engines at once)
Click “+ Add Translation” under the results to translate the same text with several engines side by side: Local Fast, the local LLM, the dictionary, your cloud engines… Each slot can switch sources independently, be added or removed, and the layout is remembered.
Top bar icons: pin the window, switch to the compact popup, history, Model Market, settings. The language row supports auto-detect and one-key swap (⇧⌘X).
Bilingual Reading / Document Translation
Menu bar → “Bilingual Reading / Documents…”. The right way to read whole articles, web pages, and books:
- Three sources: paste long text / enter a URL / import documents (TXT, Markdown, PDF, EPUB, SRT/VTT subtitles);
- Paragraph-level bilingual view, streaming in paragraph by paragraph — read as it translates;
- Retranslate any single paragraph with a different engine; export the whole piece as a bilingual PDF;
- Switching target language / engine reruns the document; finished paragraphs restore instantly from cache.
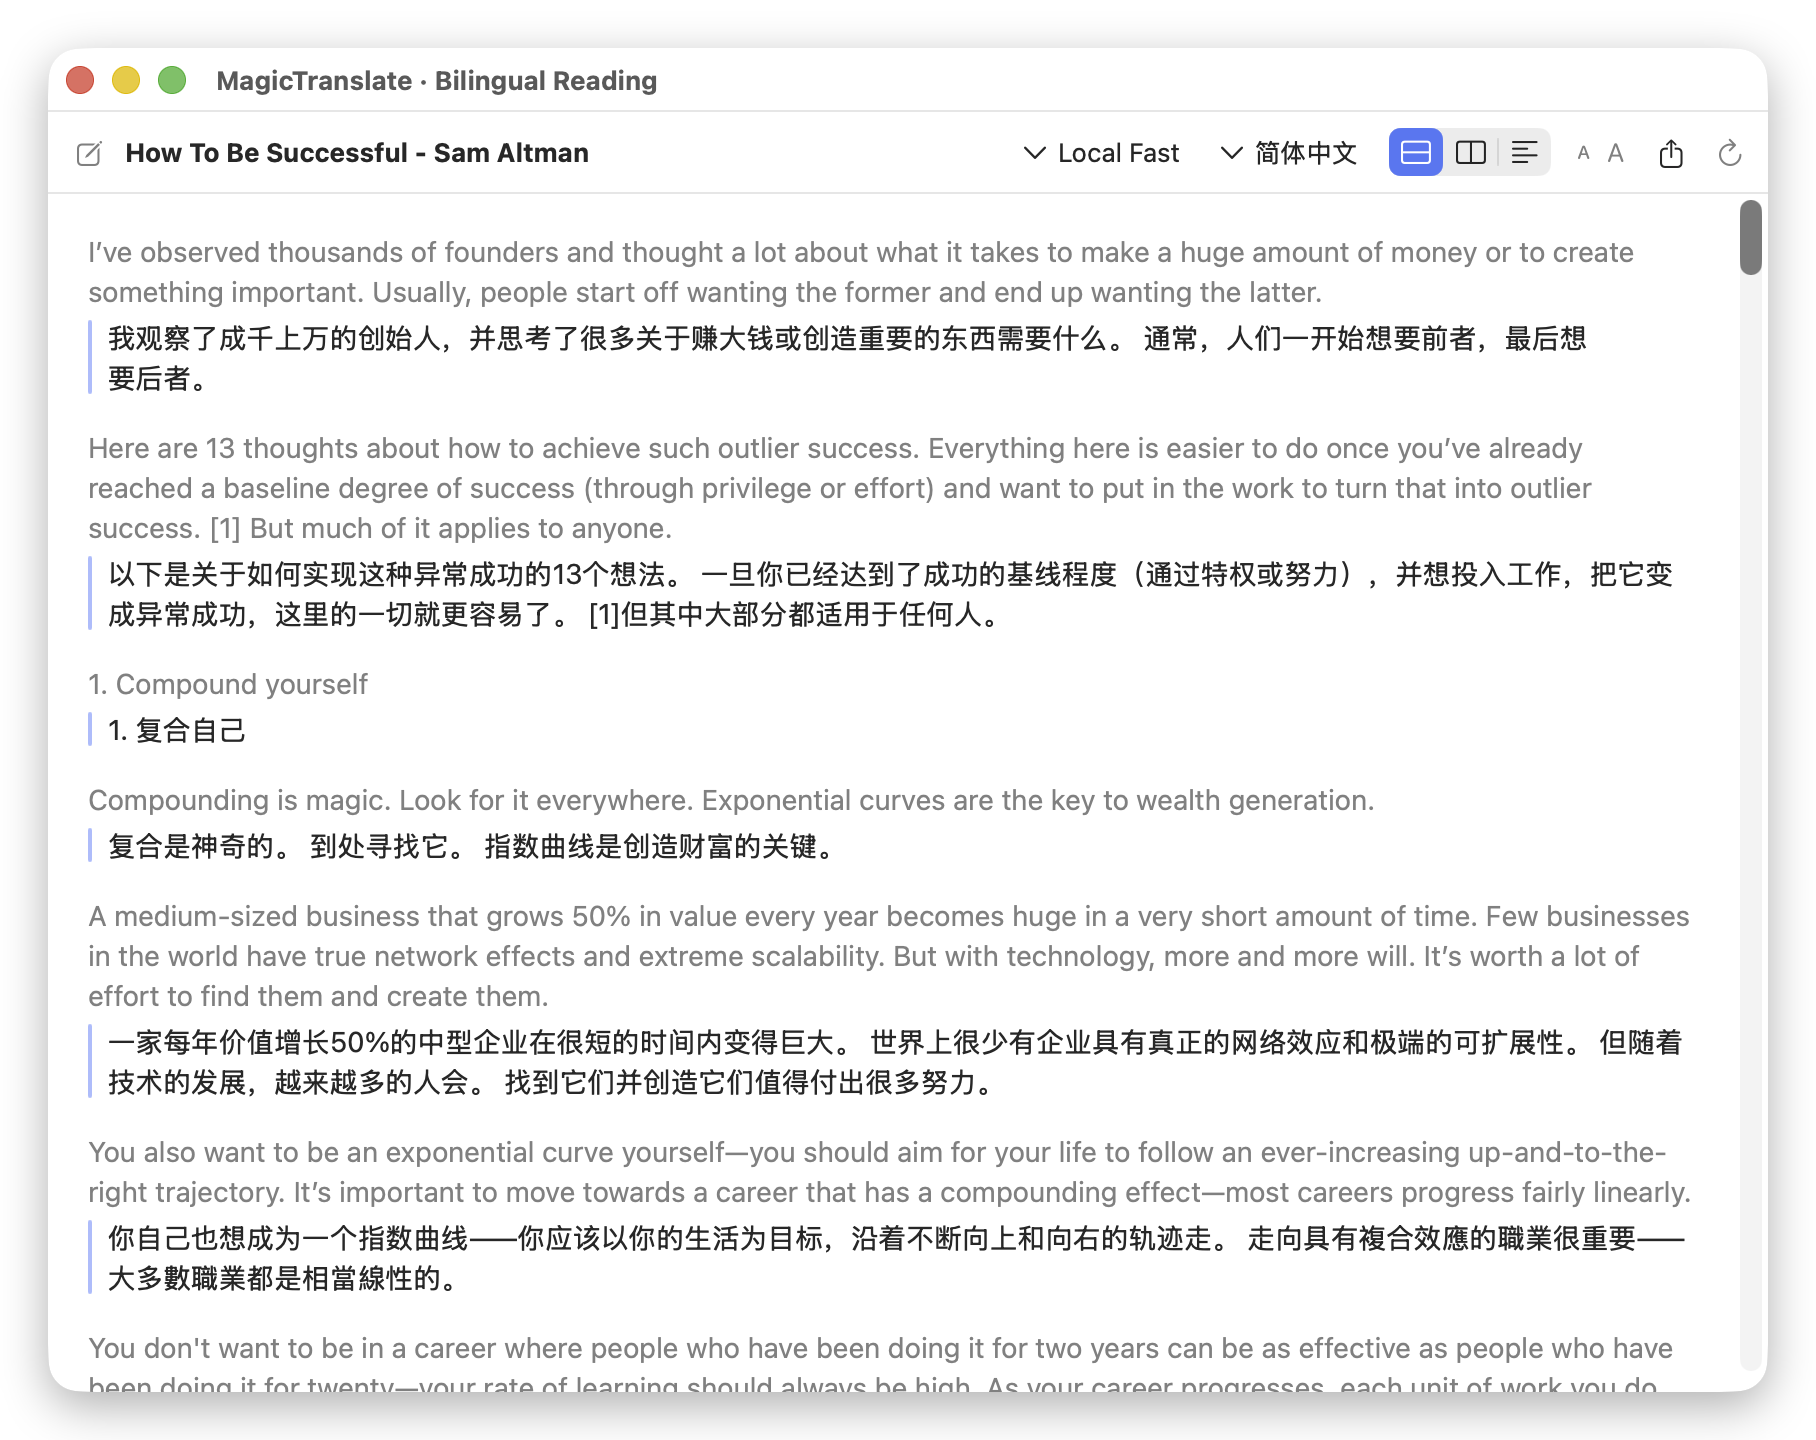
Live Captions (macOS 26+)
Designed for deaf and hard-of-hearing users: it turns the system audio of any app into real-time on-screen text — videos, meetings, podcasts, online classes — so every sentence you can't hear (or can't hear clearly) can be read instead; add translation (bilingual captions) and audio in a foreign language becomes accessible too. Menu bar → Live Captions to start. Transcription and translation (Apple language packs) both run on-device. The first launch asks for the System Audio Recording permission — it captures system audio only, never the screen contents or the microphone (a rare fallback path may use the Screen Recording channel instead).
- Accessibility first — “Original Only” mode is pure same-language captioning, giving deaf and hard-of-hearing users the same information hearing users get; “Bilingual / Translation Only” turns audio you don't understand into text you do; four font sizes (up to 40 pt) help low-vision scenarios as well;
- Hover to configure — move the mouse onto the caption bar and switch everything in place: audio language, translation language, display mode (bilingual / translation only / original only) and font size (S / M / L / XL); drag the bar to reposition it;
- Bilingual captions — translation on top, original below; pick a target in “Caption Translation” to turn it on. Choosing a language that is not installed starts the system-managed language-pack download immediately and shows progress;
- Live translation — the translation streams in while the sentence is still being spoken, then the final version replaces it;
- Quiet badge — with no audio the captions shrink to a small badge that doesn't cover the picture, and come back automatically;
- Session export — stopping captions shows a session summary: export SRT / VTT (bilingual / translation only / original only), generate timestamped Markdown bilingual meeting notes, or copy the transcript; the session is saved to History and its segments feed the translation memory.
On current macOS 26.x releases, the app dynamically discovers about 30 audio languages and regional variants, including Cantonese. The exact list follows what macOS provides on this Mac, with installed languages shown first. The menu-bar Live Captions submenu and the hover bar are equivalent — use either.
Dictionary & Vocabulary Book
Select a single word and the dictionary card appears right next to the translation — no app switching to look things up.
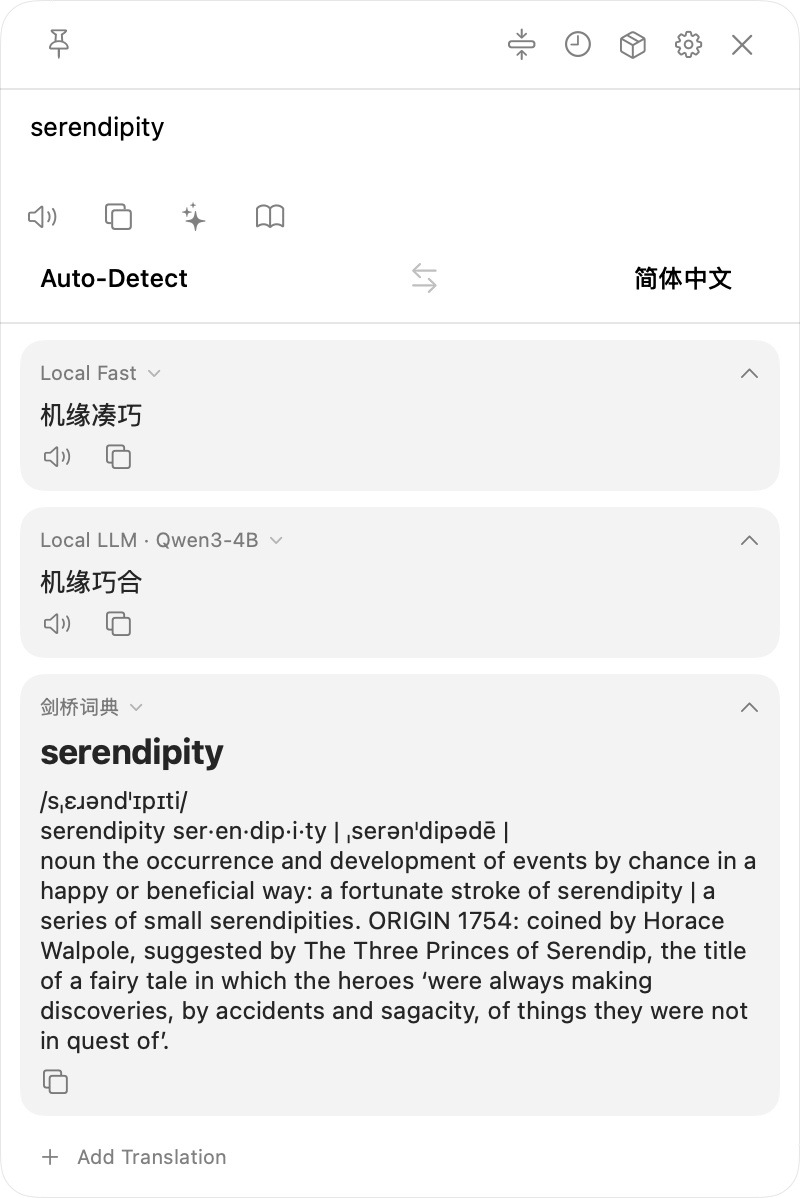
- Dictionary sources: Cambridge Dictionary (rich online entries) → automatic offline fallback to the system dictionary / built-in CC-CEDICT / CMUdict phonetics;
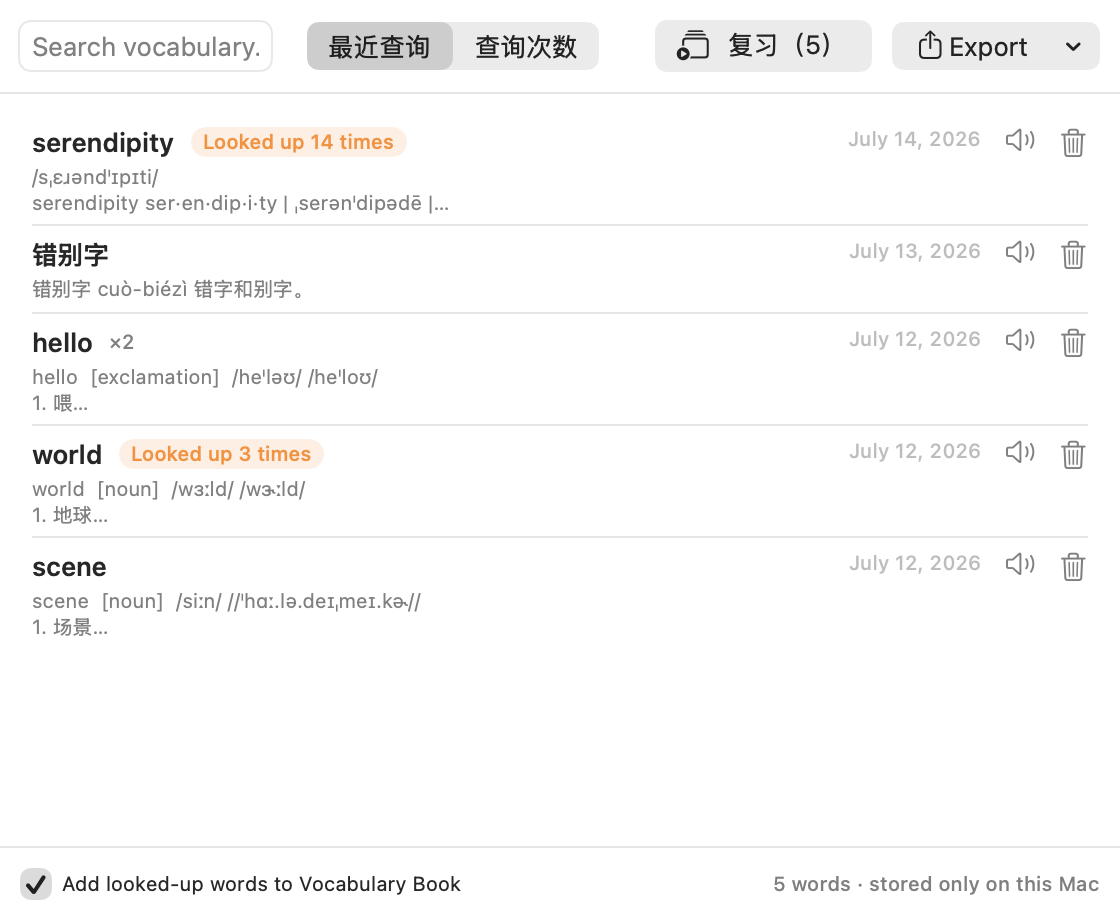
- Vocabulary Book: looked-up words are collected automatically (can be turned off), frequent ones tagged “looked up N times”; built-in review mode, plus Anki export;
- If Chinese entries ask you to enable a wordbook: open the system Dictionary app → Settings → check a Chinese dictionary.
History & Favorites
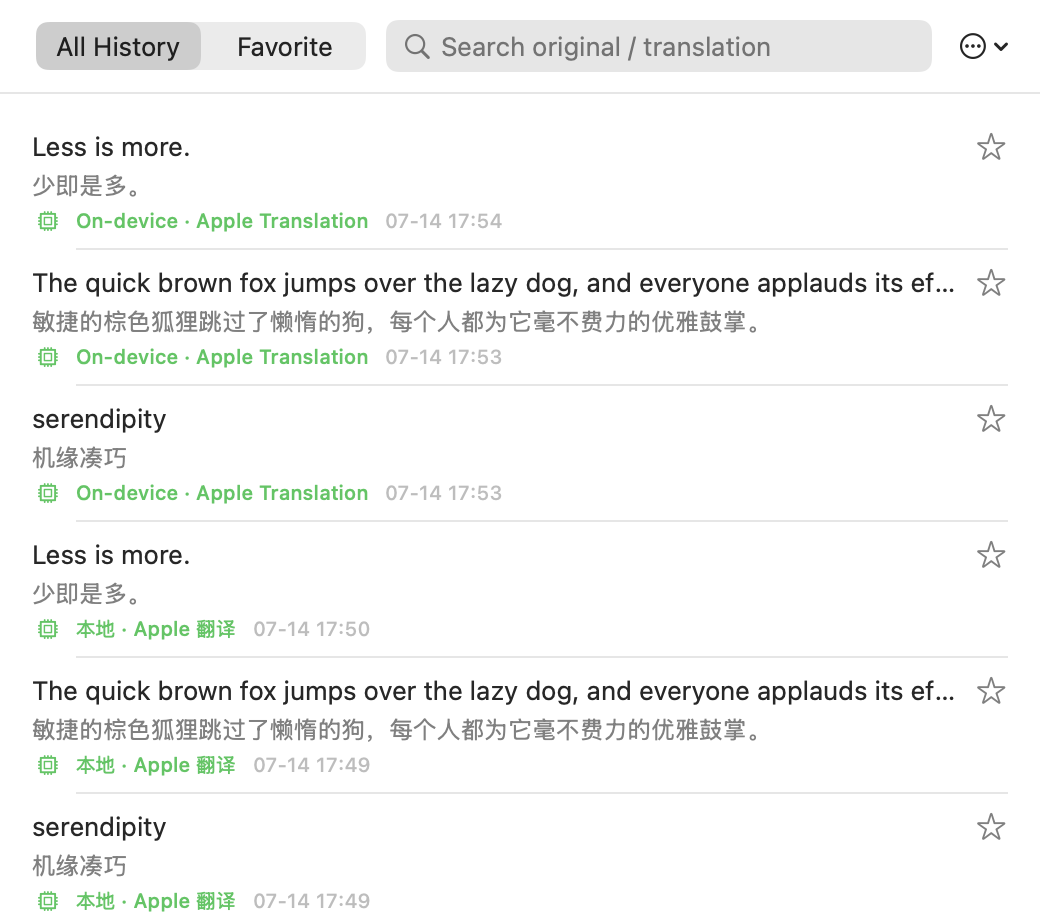
Menu bar → “History” (there's also a clock icon in the main window's top bar). Every translation is kept: original, translation, the engine actually used, and the time. Search by original or translation, star favorites (they get their own tab). All history lives on this Mac and keeps working in Privacy Mode.
AI Actions (⌘K)
Press ⌘ K in the main window or popup to run Polish / Summarize / Rewrite / Fix Grammar and more on the current text, with streaming output. You can also define custom action templates in Settings (e.g. “rewrite as marketing copy”).
AI Actions are powered by the local LLM (download once in Model Market — then fully offline), or by any cloud engine you've configured.
Shortcuts & Automation
Apple Shortcuts
Search “MagicTranslate” in the Shortcuts app for the “Translate Text” action: pass in text, choose a target language and engine, and it returns the translated string — chain it into any flow, like “translate clipboard → show notification” or “batch-translate selected filenames”. Runs in the background with no UI.
URL scheme (for third-party selection tools)
magictranslate://translate?text=hello— open the translation windowmagictranslate://reader?url=https://…— send a page to Bilingual Reading
Translation Engines
| Engine | What it's like | Setup |
|---|---|---|
| ⚡ Local Fast | Apple system translation: offline, fast, and unlimited | None (default) |
| 🧠 Local LLM | MLX-powered (Qwen3 / Hunyuan-MT etc.): stronger for long text, polishing, AI Actions — fully offline | One-click download in Model Market (Apple silicon only) |
| ☁️ Optional cloud services | Translation, OCR, and speech providers; the Mac App Store build shows only its current compliant catalog | Settings → Services → enter your own API key → Verify & Enable |
| 📖 Dictionary | Cambridge Dictionary (online) + system dictionary (offline) | None |
Model Market (local LLMs, one click)
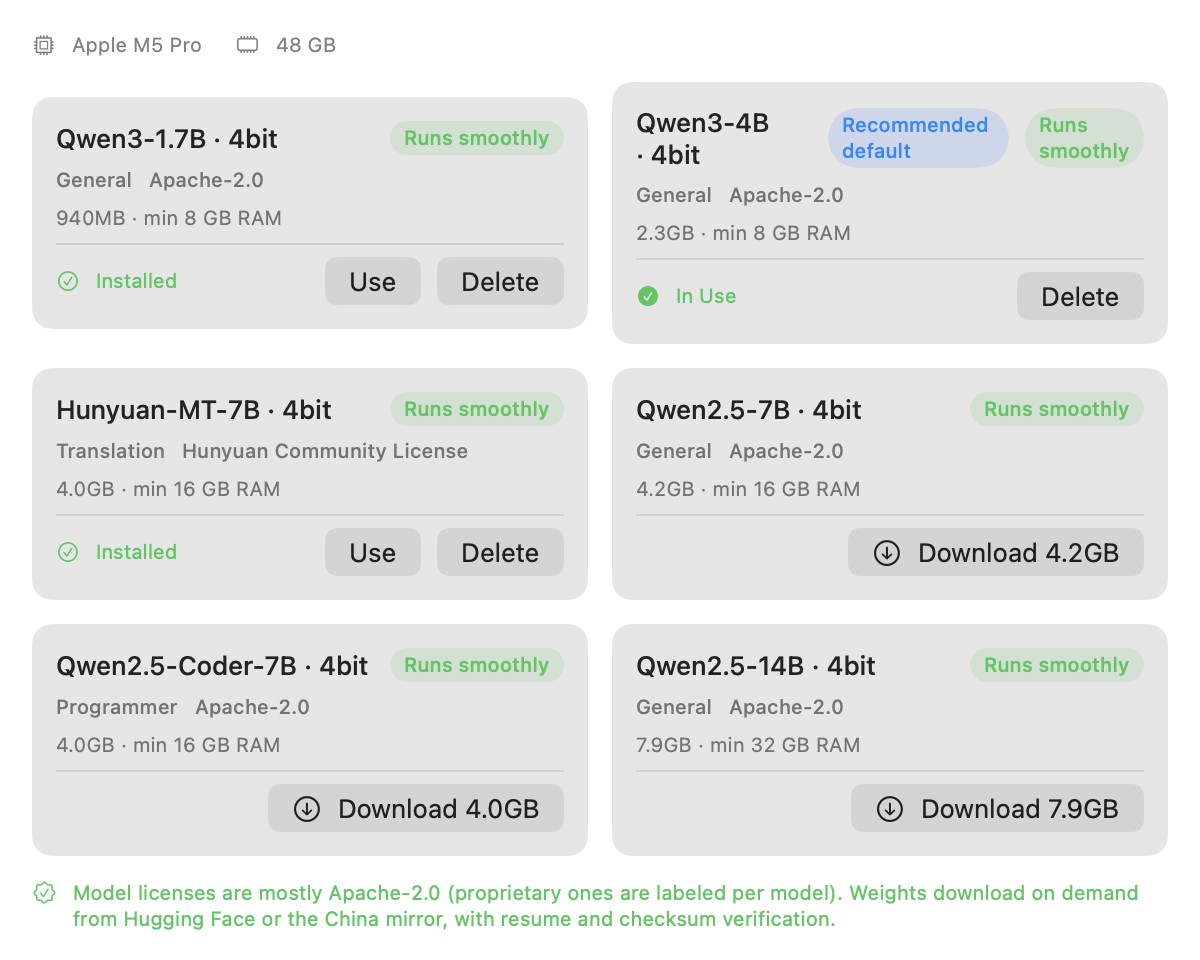
Menu bar → “Local Model Market…”. It rates what runs smoothly on your chip and RAM — pick one and click Download (resumable, checksum-verified; switch to the China mirror if you're on a network in mainland China). Once downloaded it's ready — no command line, ever.
API keys are stored only in the macOS Keychain and never uploaded; a confirmation dialog appears before text is first sent to a cloud engine (can be disabled).
Settings in Depth
Menu bar → “Settings…” (or the gear in the main window, ⌘ ,). Grouped navigation on the left: Translate (General / Services / Shortcuts), Data & Privacy (Privacy / Glossary & Persona), About.
General
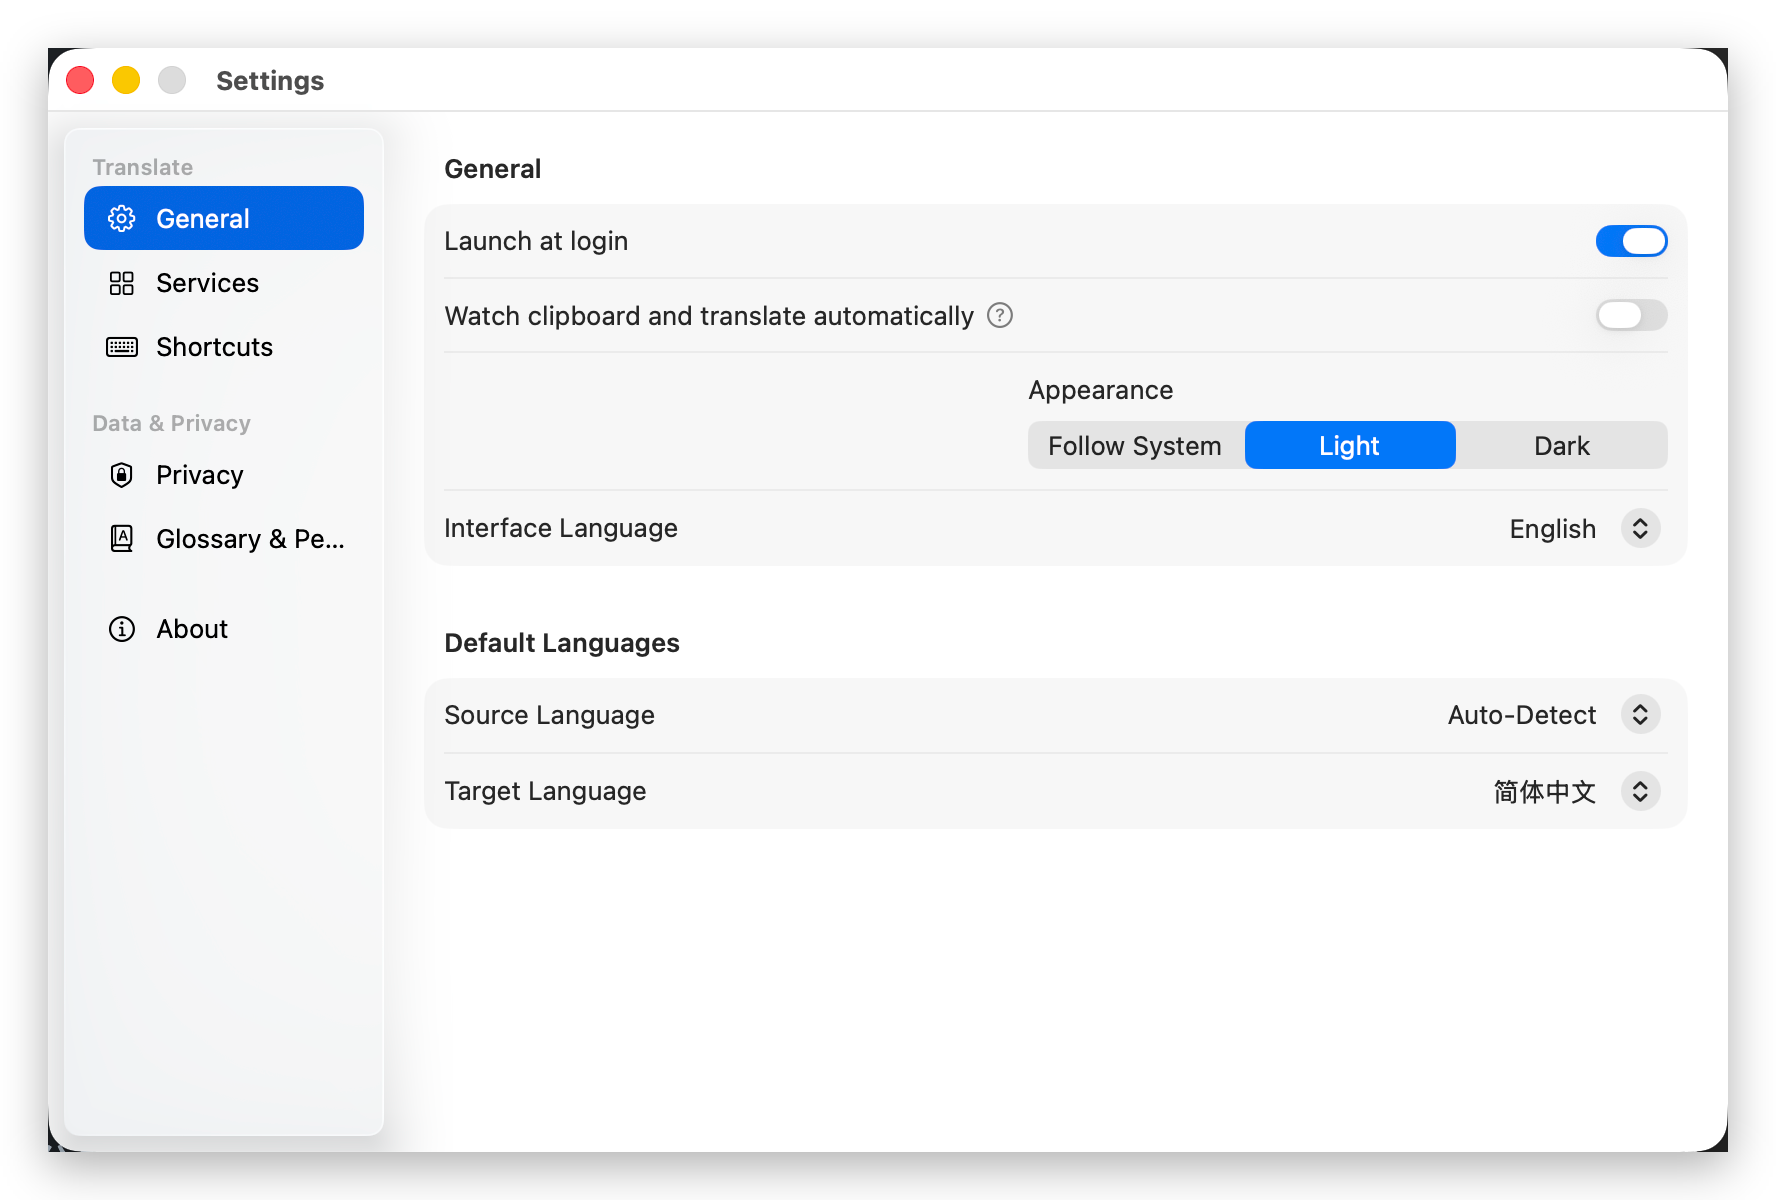
- Launch at login — live in the menu bar from sign-in;
- Watch clipboard and translate automatically — whatever you copy gets translated (handy in bursts of foreign-language reading);
- Appearance — follow system / light / dark;
- Default languages — keep the source on “Auto-Detect” (mixed text is handled intelligently); the target language is what you translate into.
Services (engines, OCR, speech)
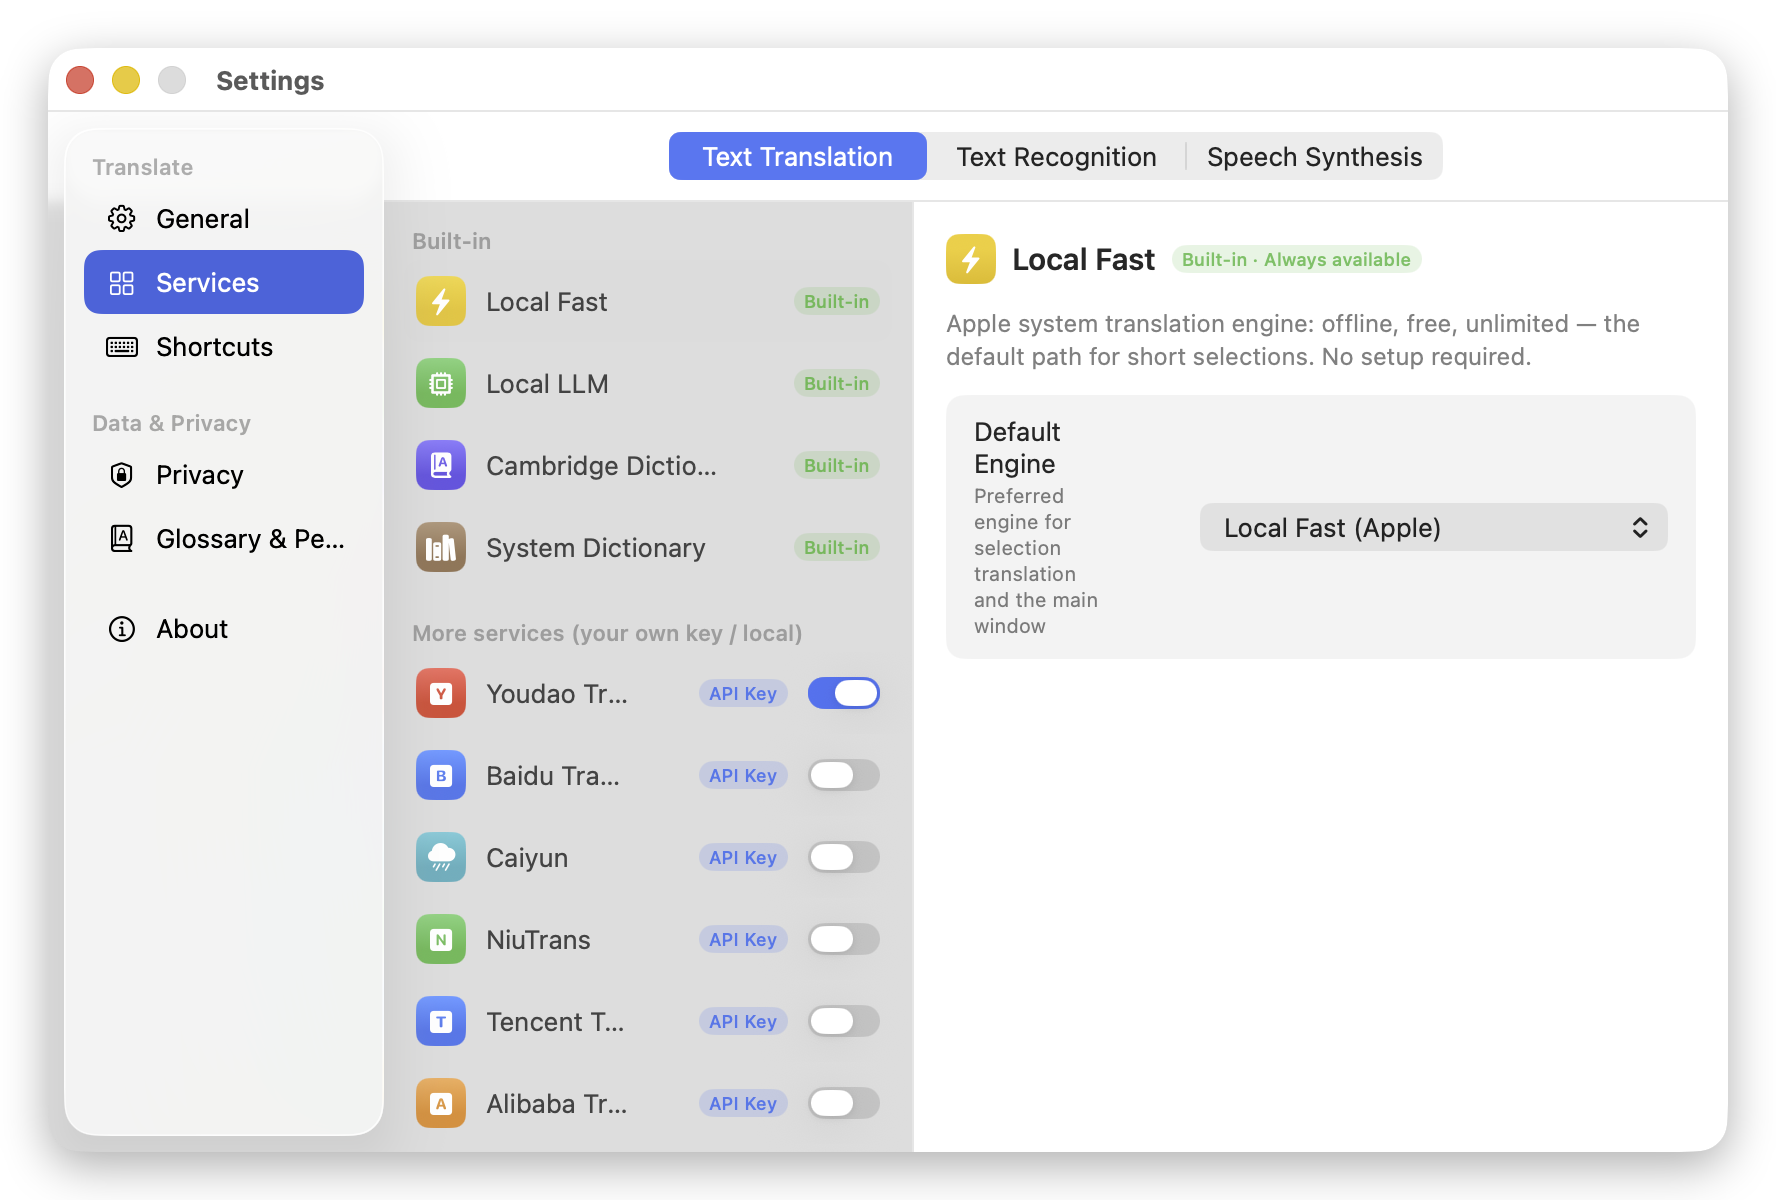
- Three tabs on top: Text Translation / Text Recognition (OCR) / Speech Synthesis;
- The “Built-in” group is always on with zero setup: Local Fast, local LLM, Cambridge Dictionary, system dictionary; the Default Engine dropdown decides what selection translation and the main window use first;
- “More services” are bring-your-own-key cloud engines: pick one → enter credentials on the right → “Verify & Enable”. The switch only unlocks after verification passes (honesty gate: not configured, not enabled).
Shortcuts
- Menu bar left-click action — show menu / open main panel / translate clipboard (right-click always shows the menu);
- Global shortcuts — rebind anything or clear it with ⊗; conflicts are flagged immediately;
- Copy-then-translate — the Mac App Store build does not register double-tap modifier monitoring or request Accessibility permission.
Privacy
- Privacy Mode — fully offline with one switch (same as ⌃ ⌥ P); “Verify Offline” actually tests the blocking, with a counter of intercepted requests beside it;
- Confirm before using cloud engines — a dialog before text first goes to the cloud, with “don't ask again”;
- Permissions — explained and requested only after the user deliberately starts a feature: Screen Recording for screenshot translation, System Audio Recording for Live Captions.
Glossary & Persona
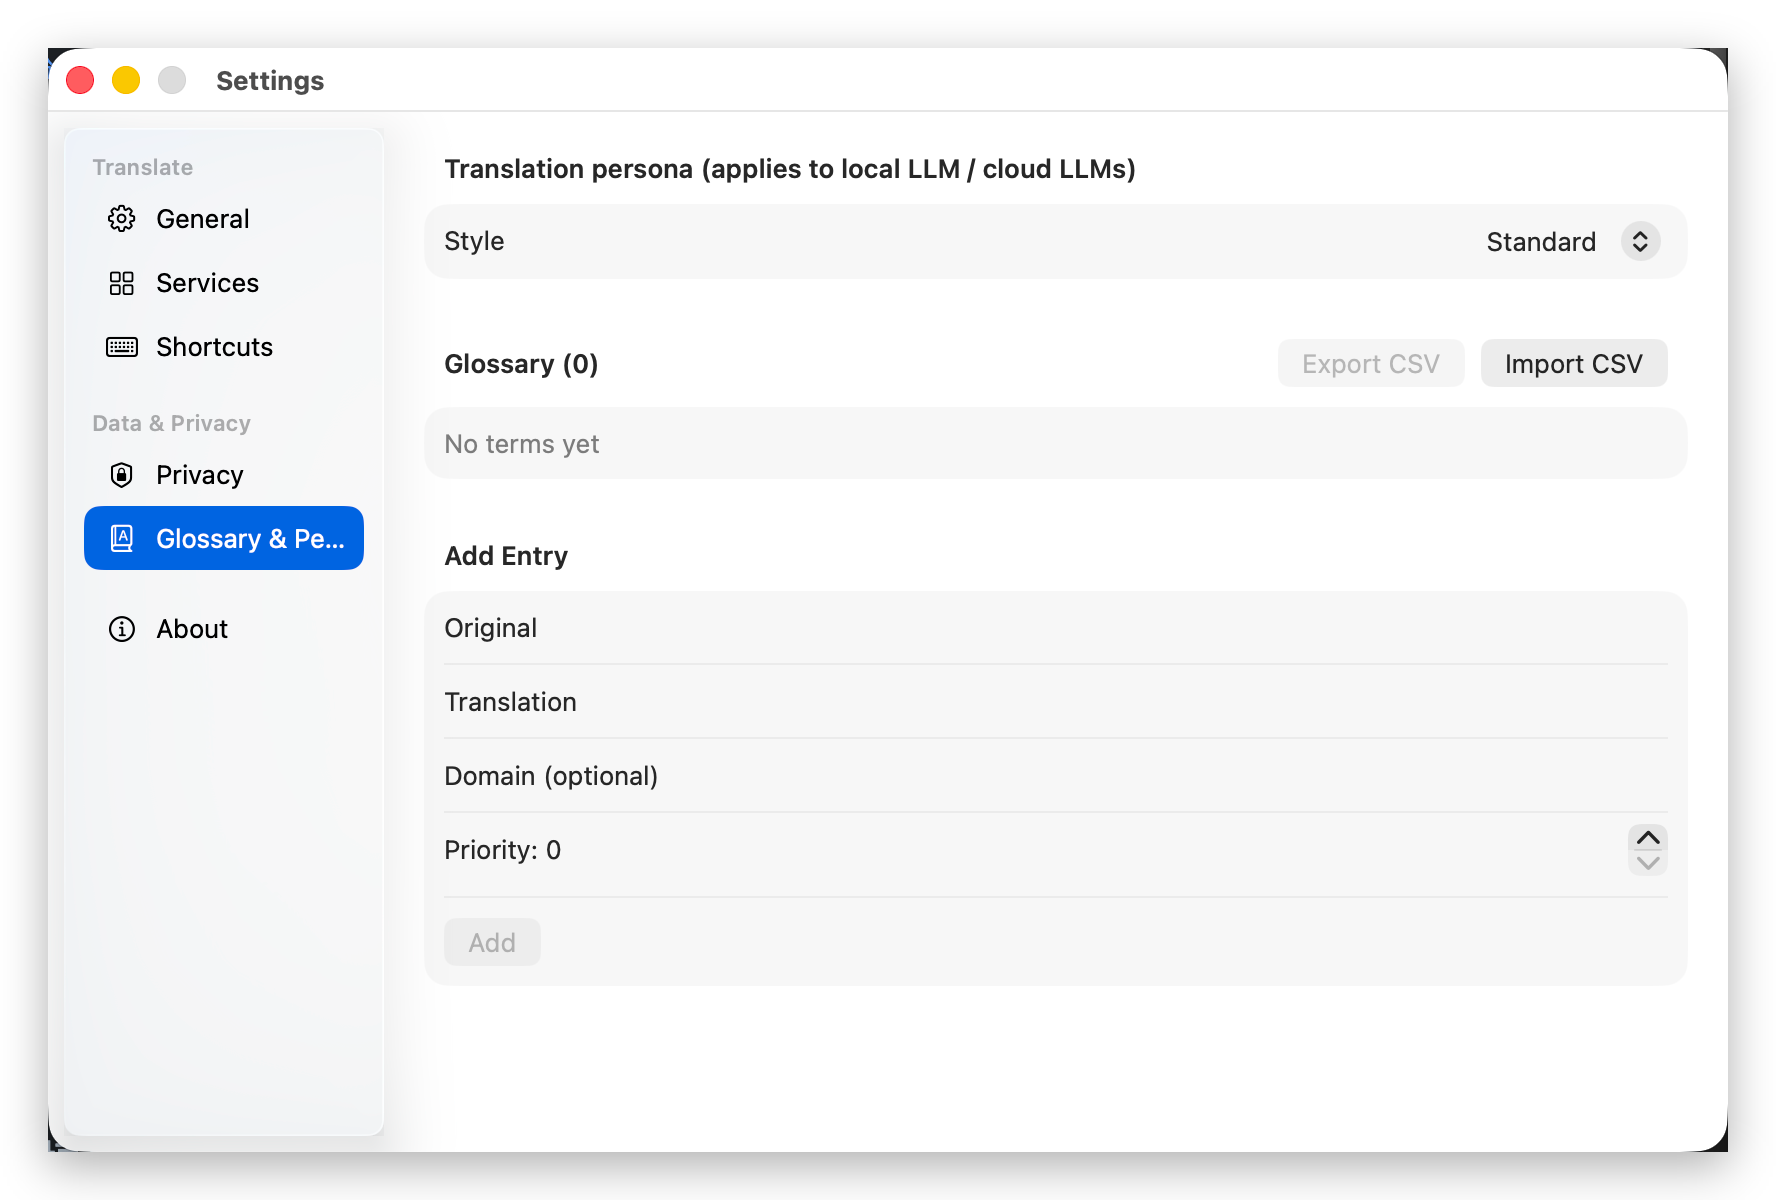
- Translation persona — the overall style applied to the local LLM and cloud LLMs (standard / more casual / more formal…);
- Glossary — enforced “source → target” renderings (with optional domain and priority), CSV import/export; team terms, names and product names never get mistranslated again.
About
Version info, quick links to User Guide / Feedback (this site), and license notes for models and dictionary data.
Privacy Mode
⌃ ⌥ P to enter: every network-facing service is disabled (cloud engines, online dictionary, model downloads); translation, OCR and speech all run on-device — peace of mind for contracts, internal docs, private content.
- Menu bar → “Privacy Weekly”: honest stats on local vs. cloud processing and blocked outbound requests;
- History, vocabulary and all other data stay on this Mac.
FAQ
Which Macs are supported?
macOS 15 or later with Apple silicon (M1 and newer). Intel Macs aren't supported by the current version.
Translation spins forever / says a language pack is missing?
Local Fast needs a one-time system language pack per direction: download when macOS prompts. If no prompt shows, retry once in the main window, or grab it in Model Market → Apple Language Packs.
Copy-then-translate doesn't react?
The Mac App Store build reads only text you deliberately copied: copy in another app, then press ⌥ D, or choose “Translate Clipboard” from the menu bar. An empty clipboard opens the input window. Accessibility permission is not required.
Screenshot translation shows black / recognizes nothing?
Check the Screen Recording permission. Empty recognitions stay silent by design — try a clearer area.
Live Captions missing from the menu / not reacting?
Live Captions requires macOS 26 or later (the menu item is hidden on older systems); grant the System Audio Recording permission when prompted (system audio only; a rare fallback path may use the Screen Recording channel instead). Translation on but nothing shows: download the language pack when macOS offers it, or grab it in Model Market → Apple Language Packs. The current version processes only system audio playing on the Mac and does not use the microphone.
How is this different from macOS's built-in captions / translation?
The system's Live Captions transcribe without translating; Generated Subtitles on macOS 27 is English-only, applies only to the AVPlayer pipeline, and does not connect "audio in → translated subtitles out" (as of 2026-07). MagicTranslate's captions cover system audio from any app (including web players in browsers), ~30 audio languages including Cantonese, transcription + translation together on screen, glossary support, and SRT/VTT/notes export.
Why local-first?
Translation, OCR, caption transcription, and local LLMs can run directly on your Mac and keep working offline. When you need a cloud engine, you can connect to the provider with your own API key. See the Product Notes page for current behavior.
Local model download slow / failing?
Switch the download mirror in Settings (recommended on networks in mainland China); downloads resume automatically — just retry.
Simplified ↔ Traditional Chinese?
Just pick the target variant: conversion runs on-device via ICU glyph mapping, returns in milliseconds, and is honestly labeled “Simplified ⇄ Traditional · glyphs only” (no vocabulary localization — e.g. 内存 won't become 記憶體).
Cloud engine says “No API key configured”?
Cloud engines use your own key (costs under your control, privacy in your hands): Settings → Engines → pick a service (each links to a how-to) → enter the key → “Verify & Enable”.
Feedback
Found a bug, a bad translation, or missing a feature you need? Write it below — every single entry gets read. In the app: menu bar → User Guide & Feedback leads right here.